Challenge: A Large Polymer Clay Bowl
A challenge! That's what I need to take me away from the world's overwhelming daily concerns. So I wondered how big of a polymer clay bowl I could make. What could I use for a form? What technique would I use? How much clay would it take and what would fit in my oven?
You've seen my 'Small Bowls for Little Things' on my Facebook Page (https://www.facebook.com/LindaBrittDesign/) and in my Etsy shop (https://www.etsy.com/shop/LindasButtonsBowls). If not, please take a look! Those same questions were ones I had to answer when I started making the small bowls except in the other extreme. How small could I make a bowl and it still be useful, what form to use and what technique?
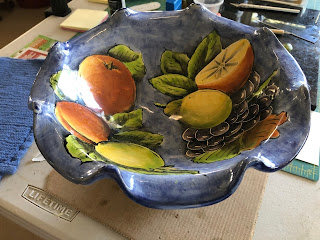
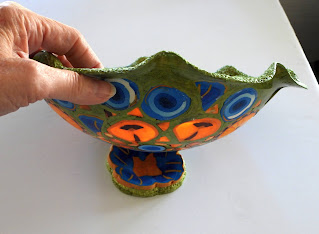
One of my favorite bowls is a handmade Mexican pottery bowl with a scalloped edge. It just fits in my little oven if I take the rack out. I can use some of my large 3" cane slices that were left over from a Christmas ornament project as they will add interest. The plan develops into a blue, yellow and green field of flowers - a millefiore design.
First I need to place the large canes in a pleasing pattern. Using liquid clear polymer will keep the cane circles pretty much where I want them as I place the green strands of polymer (Cernit metallic green) around them. Let me explain why I use strands. It is important to keep the polymer an even thickness throughout the bowl. If I use the pasta machine to give me a bigger flat piece of polymer, I have to cut and shape the spaces between the canes. As you can see there are lots of tiny spaces. I'll the extruder to make several strands the same size and thickness as the canes. Then the strands can be easily moved into the empty spaces.
There is something else I need to consider when I fill the empty spaces with green. Texture and pattern! Inside the bowl there will be texture I make with a tool but the underside of the bowl will show the lines or edges of the strands. It will be important to have a rhythm or consistency when I turn the bowl over. More experimentation!
The video I made to show you how I make the textures will not load here! Sorry! Making the texture takes patience and time! I use a tiny ball tool to make the tiny imprints and move the clay about.
About halfway up the sides of the bowl, it is obvious to me that baking will enhance the rest of the process. Clay can be baked several times at the same temperature and not hurt anything. In fact, in this case it will keep me from mashing the green texture with my hand. Everything needs to be as perfect as possible because once I bake the clay it becomes harder and less malleable.
I realized I am going to be out of clay very soon! I admit it! I'm going try incorporating another color. It's obvious more clay has to be ordered and the waiting starts!
Back to work. Finish the green spaces being careful on the scallop edges. Bake it again. 275 degrees F for an hour. Let it cool before removing it from the form.
Just a side note! May I suggest finding a bowl form without a pattern? This bowl form had fruit and leaves painted on it. It was difficult to block that pattern and colors out of my mind when my clay was placed on it.
Next morning I carefully remove my bowl from the form; turn it over to see how the underside looks. Lovely! The edges of my designs show and the patterns work. Happy Dance!
The edges of the scallops need to be sanded for smoothness but that is all. Baking on a glass or shiny surface produces a shiny finish to the clay. When you start to place the clay on your form, you have to decide where you want the shiny finish - inside or out!
The last thing is to make a concave foot to hold the bowl. I have not decided if I want to glue it on the bowl or just set the bowl in it. This bowl will be for decorative purposes or perhaps hold fruit. It will not hold water as there are a few small open spaces. It can be washed. If I want it to hold water, I need to coat it with clear polymer or place a thin layer of polymer over the back. Then I lose the pattern on the underside. Also some of the canes are translucent and l like the light coming through.
This is a longer than my normal post. Sharing experiences and keeping a log are two reasons I write these posts. It becomes my journal as well as a way to communicate with you. Please leave your comments. I'd love to hear from you.


These bowls are creative and colorful...perfect for display or for holding small trinkets, jewelry, coins, keys. Wonderful!
ReplyDelete